The public guide is checked against the app, installers, compatibility contract, release workflow, and website access flow. The same task-oriented help is available inside Quill: open the menu → Help, or run quill --help outside the TUI.


Start here
From download to first send
Install the right native build, understand the terminal fallbacks, and connect the destination you want to use.
Start here
Install, activate & first launch
Get access, choose the right native build, and verify the install.
- Get access. Choose a paid plan on the pricing page. Monthly and yearly are visible before sign-in. Choose one, then sign in with Google, GitHub, or an email magic link; Quill returns to the selected plan and opens secure Paddle checkout. Access and downloads begin only after Paddle confirms payment. If the developer sent you a private evaluation or complimentary-access link, open it before signing in and accept it with the intended verified account.
- Open your account. Choose the download that matches your operating system and processor. If an administrator granted access while the page was open, select Refresh status first. Copy the license key only if you need the headless/fallback activation path, and keep it private.
- Run the recommended installer. Use the macOS .pkg, Windows Quill Terminal Setup, Ubuntu/Debian .deb, or Fedora/RHEL .rpm. Portable archives remain under Advanced on the download page.
- Open a new terminal and verify the binary.
quill --version
quill
- Activate this computer. Press Enter (or B) on the activation screen, sign in with the same Google, GitHub, or email account used on the website, and approve the computer shown. A headless machine can press K to reveal the separate private license-key fallback, then use Ctrl+B to return to browser mode. Either path produces the same signed, device-bound lease in the operating system's credential vault.
Browser approval is short-lived and explicit. If the tab is closed, press B again to reopen the same request while it is valid; start a new request after it expires. Quill never receives the website cookie, OAuth token, or identity-provider password. Failed authentication, cancellation, inactive access, a revoked device, or a full device limit leaves the app locked.
Quill proves that its shared license coordinator and secure credential storage are writable before requesting a server device registration. If that preflight fails, the activation controls are replaced with recovery guidance. On Windows v0.12.11 and newer, the private coordinator, encrypted fallback, and stable installation identity live under %LOCALAPPDATA%\Quill\state. If the final secure save still fails after approval, Quill releases only the new device row created by that request; it never removes a device that existed before the request.
A requested file, one-run target, or incoming pipe waits behind this gate and resumes only after approval. Quill does not open the document workspace, provider process, or API key before entitlement is established.
macOS
macOS 12+ · Apple Silicon or Intel
.pkg installer
Windows
Windows 10/11 x64 · Windows 11 ARM64
Quill Terminal Setup
Linux
glibc 2.34+ · x86_64 or arm64
.deb or .rpm package
On a headless Linux machine, install a downloaded package with sudo apt install ./quill-<version>-<target>.deb or sudo dnf install ./quill-<version>-<target>.rpm. Native installers place quill on PATH. Windows Setup also adds a Start Menu shortcut and can create a desktop shortcut. Those Windows shortcuts close after a normal exit but keep a fatal startup error visible so it can be diagnosed.
macOS or Linux · Homebrew
brew install arafayrs95/tap/quill
macOS or Linux · verified shell installer
curl -fsSL https://quillterminal.app/install.sh | sh
Windows PowerShell · verified installer
irm https://quillterminal.app/install.ps1 | iex
The command-line installers detect the platform and architecture, verify the release checksum from Quill Terminal's independently validated release manifest, and refuse a mismatched download. Homebrew verifies its pinned archive checksum too. These are alternative installation methods—choose one; you do not run them after the native installer. The Download page always shows the current macOS and Windows signing state and any required one-time Gatekeeper or SmartScreen approval.
macOS: if the package says “Not Opened”
- Choose Done, not Move to Trash.
- Open System Settings → Privacy & Security, scroll to Security, and find the blocked Quill Terminal package.
- Choose Open Anyway, authenticate, then confirm Open. Apple makes the button available for about one hour after the blocked attempt.
- Complete the normal installation wizard.
Windows: if SmartScreen blocks Setup
- Confirm the file name is the Quill Terminal Setup downloaded from quillterminal.app.
- If Microsoft Edge says the file is not commonly downloaded, open Downloads, use the file's three-dot menu, and chooseKeep. In the next message choose Show more →Keep anyway.
- On “Windows protected your PC,” choose More info and then Run anyway.
- Complete the normal per-user setup wizard.
A managed computer may prevent manual approval. Follow your organization's policy rather than disabling security controls.
What verification is automatic, and what is optional?
Automatic: Homebrew verifies its pinned SHA-256. The shell and PowerShell installers detect your platform, fetch the independently validated release manifest, verify the selected archive checksum, and stop on a mismatch.
Optional for browser downloads: the native installer cannot verify its own file before the operating system lets it run. You can hash the downloaded file and compare it with the exact SHA-256 shown on the Download page—recommended before manually approving an unsigned Mac or Windows build.
macOS or Linux · manual browser-download check
shasum -a 256 <downloaded-file> # macOS
sha256sum <downloaded-file> # Linux
Windows PowerShell · manual browser-download check
Get-FileHash .\<downloaded-file> -Algorithm SHA256
Advanced and optional: the Download page also links the canonical checksum file and Sigstore bundle and renders the exact cosign verify-blob command for the current release. Normal users do not need to run it.
Start here
Operating systems & terminals
The supported platform contract, representative terminals, and portable fallbacks.
Quill Terminal supports terminal profiles, not a fixed logo list. Its release gates cover POSIX PTYs, the enhanced keyboard protocol used by modern terminals, and Windows Console/ConPTY. The clients below are representative of those contracts; they are not a claim that every historical release of every terminal emulator has been run by hand.
| Terminal profile | Representative clients | Send | Change pane |
|---|---|---|---|
| POSIX legacy PTY | Terminal.app, iTerm2, GNOME Terminal, Konsole, Alacritty, WezTerm, tmux, zellij, SSH | Alt+Enter | F6 / Shift+F6 |
| Enhanced POSIX | kitty, WezTerm, iTerm2 | Ctrl+Enter | Ctrl+Tab / Ctrl+Shift+Tab |
| Windows ConPTY | Windows Terminal, PowerShell, Command Prompt | Ctrl+Enter | F6 / Shift+F6 |
The on-screen Send Compose and Send Preview buttons provide a send fallback. On macOS and Linux, use Alt+Enter when a terminal cannot distinguish Ctrl+Enter. On Windows, use Ctrl+Enter or the button; many Windows terminals reserve Alt+Enter for full screen. F6 and Shift+F6 remain portable pane-navigation fallbacks everywhere.
Minimum platforms are macOS 12 on arm64 or x86_64; Linux x86_64 or arm64 with glibc 2.34 or newer; Windows x64 build 17763 (Windows 10 1809) or newer; and Windows ARM64 build 22000 (Windows 11) or newer. Windows 10 on ARM and all 32-bit builds are unsupported. Windows Terminal is recommended for the best Windows experience.
Start here
Your first prompt
Compose, preview, choose a destination, and send without leaving the terminal.
- Write Markdown in COMPOSE. The PREVIEW pane renders its structure live.
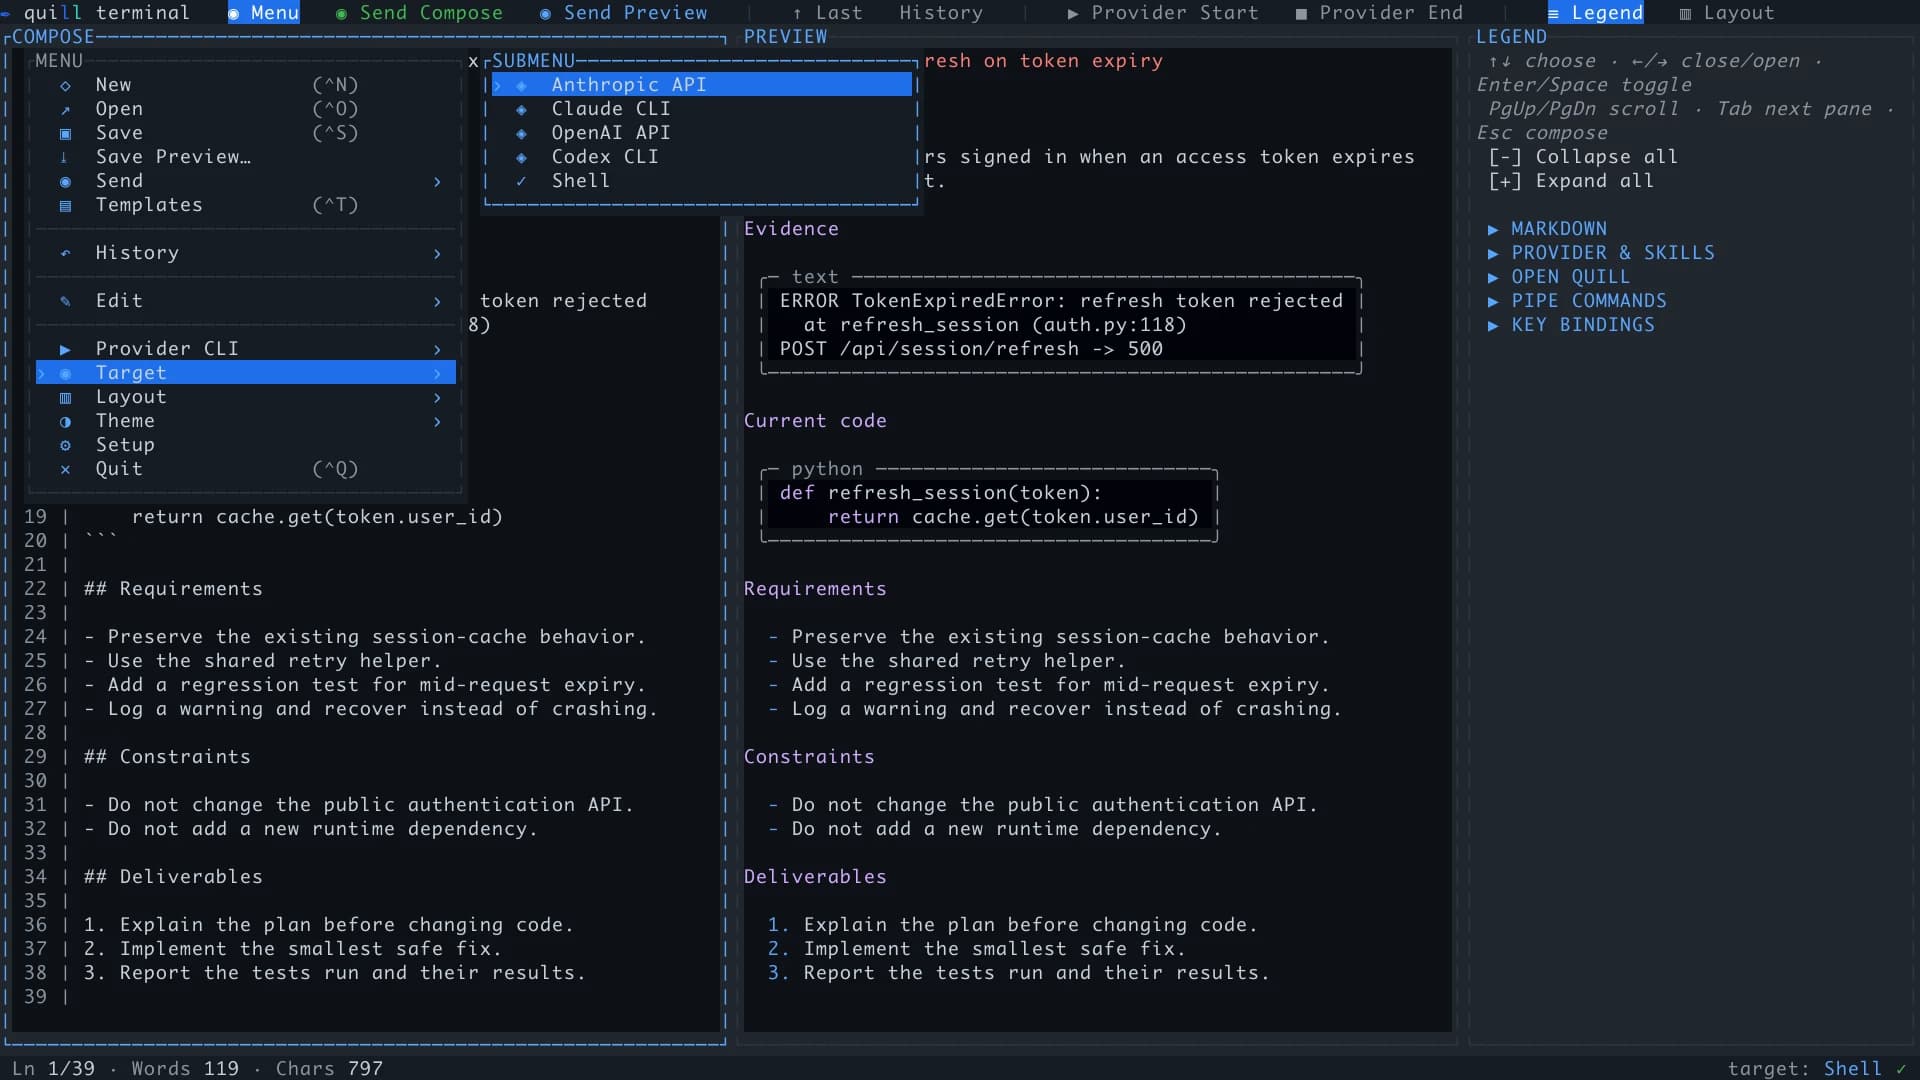
- Open F2 → Target, or use Ctrl+R to cycle targets.
- For a direct API, add and verify its key under F2 → Setup → Providers. For Claude Code or Codex, install and authenticate that CLI outside Quill first, then launch it with F4. Shell needs no provider account.
- Send with Ctrl+Enter, the platform fallback described above, or Send Compose. Use the adjacent Send Preview action to convert Markdown to readable text before sending.
- API replies stream into PROVIDER. CLI and Shell targets receive the prompt inside their real terminal session.
Preview follows CommonMark rather than duplicating Compose character for character. One source newline inside a paragraph is a soft break and renders as a space. Use a blank line for a new paragraph, or two trailing spaces, a trailing backslash, or <br> for a visible hard break. Valid pipe tables render as aligned tables; put spacing-sensitive ASCII tables, logs, and diagrams in fenced code blocks so every space and newline remains literal.
Quill accepts a file, a one-run target, or both when it starts:
quill                                  # open the workspace
quill login                            # browser sign-in / verified Account status
quill status                           # verified local account / offline lease
quill refresh                          # sync online (alias: resync)
quill logout                           # sign out (aliases: signout / sign-out)
quill prompt.md                        # open a file on startup
quill --target claude-cli              # open with a one-run target
quill prompt.md -t codex-cli           # open a file and target together
git diff | quill                       # insert at cursor, or open a new unsaved draft
git diff | quill --new-instance -t shell
git diff | quill --append
quill --stdout compose > draft.md
quill --help                           # full CLI, Legend, setup, paths, and diagnostics reference
quill --version
Except for reserved account/help commands, the positional argument is an existing Markdown or plain-text file path; quote it when it contains spaces (for example, quill "release notes.md"). The dedicated quill login command starts browser approval when the app is locked, or opens the verified Account panel when this installation is already active; it deliberately does not accept a file, target, pipe, or stdout mode. Use quill ./status to open a file named status (the same rule applies to other command names). Missing files and misspelled targets fail before the workspace opens. Use -t or --target with anthropic-api (alias claude-api), openai-api (alias codex-api), claude-cli, codex-cli, or shell. CLI/Shell targets use the saved ask-before-launch policy; missing installs, logins, or API keys preserve the draft and never reroute it. A targeted pipe requires --new-instance, so another open editor is never retargeted. Choose again later with F2 → Target or Ctrl+R, or save a future startup target under Setup → User Config.
To pass literal arguments to an explicit CLI or Shell target, place them after --, for example quill --target codex-cli -- --add-dir "../shared docs". They override that target's saved arguments for this Quill session; saved defaults remain intact. API targets do not accept this form. The F4 argument field supports quoted groups without variable, glob, or command expansion. Use F2 → Provider CLI → Resume session for earlier managed conversations, or Shell for the provider's own resume/fork command. Without a target, quill -- -prompt.md still opens a single option-shaped file. With a target, use ./-prompt.md or an absolute path before the argument separator.
quill status verifies the local signed lease without an online request. quill refresh (or resync) requests the same online check as Account Refresh. If it fails, it returns a nonzero exit status and keeps any existing valid offline lease with its old last-checked time. quill logout (signout or sign-out) signs this installation and its open Quill instances out, preserving recovery without cancelling billing or provider logins. These commands do not open the editor, consume stdin, or accept workspace flags.
Run quill --help outside the TUI for the same fully expanded Legend plus every option and target alias, activation and provider-key setup, the resolved local config, template, history, and recovery paths, installer links, and the privacy contract for diagnostics. Printing help is read-only and does not create Quill's data directory, read the credential vault, or start licensing or provider work.
Start here
Send targets: API vs CLI vs Shell
Choose between direct provider calls, managed coding CLIs, and your own shell.
Anthropic / OpenAI API
Direct calls using a stored provider key or environment fallback. Replies stream with usage and supported cost estimates. Image pixels travel as structured API content.
Claude Code / Codex
The installed CLI runs in a real PTY/ConPTY with its own login, commands, colors, keybindings, scrollback, and resumable per-directory sessions.
Shell
Your configured operating-system shell runs in the pane. Resolved compose text is handed to it without model-assisted rewriting for scripts, commands, or tools you launch yourself.
Send Compose preserves your Markdown source. Send Preview converts it to readable text: heading and emphasis markers disappear, while list structure, link destinations, and code fences remain. This conversion uses the complete document, independently of Preview's size, wrapping, or scroll position; it does not send terminal colors or a screenshot. Both actions resolve Quill-managed chips before handoff: collapsed pastes become their complete text, CLI and Shell image chips become local file paths, and API images travel separately while the prompt keeps a neutral marker so your local directory is not disclosed. Guarded terminal handoff also rejects or neutralizes unsafe control content.
Set and save F2 → Setup → User Config → Default Send to choose the primary button and Ctrl+Enter action, with Alt+Enter as a fallback where the terminal reports it. Compose is the initial default, and the adjacent button always offers the other choice. F2 → Send also offers both actions. Ctrl+Shift+Enter sends Preview explicitly where supported; Alt+Shift+Enter works where the terminal reports it. Shell always sends Compose source and rejects explicit Preview sends so conversion cannot change a command.
Preview sends stop with an explanation if safe conversion would omit an oversized table or exceed the document limit. Your draft stays in Compose so you can revise it or choose Send Compose explicitly.
With history enabled, Last and history recall restore the original Compose source after a Preview send. History keeps the actual submitted text and send mode alongside the source needed for recall.
CLI targets use the CLI's existing authentication and do not need Quill's provider API-key field. Managed Claude Code and Codex sessions are resumable. A program launched manually inside Shell belongs to that ephemeral Shell tab and is not added to Quill's resume registry.
A managed CLI remains fully interactive: focus PROVIDER and type, run slash commands, change the CLI's own model or reasoning mode, interrupt work, and scroll or copy its output exactly as you would in a normal terminal. Quill's model and tuning controls apply only to direct Anthropic and OpenAI API targets. Sending from Compose hands the reviewed prompt to the same live CLI session; it does not disable direct terminal input.
Start here
Connect a direct API
Create, verify, store, audit, and remove Anthropic or OpenAI API keys.
Direct API targets use the provider's metered API billing, which is separate from a Claude or ChatGPT subscription. Create a key on the provider's official platform:
- Anthropic: platform.claude.com/settings/keys.
- OpenAI: platform.openai.com/api-keys.
- In Quill, open F2 → Setup → Providers, paste the key, and choose Verify. Quill checks the key with the provider before saving it and discovers the models that account can use.
Verified keys live in macOS Keychain, Windows Credential Manager (or a per-user, machine-bound DPAPI-protected fallback), or the Linux Secret Service—not in plaintext config.toml, logs, prompts, or history. Managed CLI and Shell processes launch with provider API-key variables removed. When Quill performs an actual provider-key secure-store read, it makes a best-effort, secret-free audit entry in keychain.log. Successful reads are cached per provider for this process. Failed, missing, or invalid reads retry on the next Send or Verify, including before a usable environment fallback. Deleting a stored key in Setup removes the credential-vault entry; a failed deletion keeps its reference so it can be retried.
Selecting a direct API target, including restoring it at startup, does not read or verify its credential. The first Send or an explicit Verify action reads the saved key when it is actually needed. This keeps target navigation credential-free.
Verify lists models without sending a completion. Discovery follows Anthropic pagination and rejects malformed or incomplete results. An authentication rejection is different from a model-list permission error. The saved verification time and result describe that check; an old success cannot guarantee today's model access or quota.
Direct API sends can also use ANTHROPIC_API_KEY or OPENAI_API_KEY from Quill's environment when no usable cached or stored key is available. This fallback works on macOS, Windows, and Linux. Delete removes a saved vault key; unset an environment key in the shell that starts Quill.
For direct APIs, Setup → Providers also selects the model and the tuning that model actually supports. Quill offers Anthropic effort or thinking controls where available, OpenAI reasoning effort for reasoning families, and temperature for compatible non-reasoning models. Explicit Verify refreshes the account's model choices. Known capabilities guide optional parameters, and unknown models use conservative defaults. A downloaded capability manifest applies at the next launch or settings reload. Quill currently does not show announced model shutdown dates or automatically replace a selected model.
Linux and headless sessions
Saving a key on Linux requires a running, unlocked Secret Service such as GNOME Keyring or KWallet. Minimal SSH sessions, containers, and servers may not provide one. In that case, set an environment fallback before starting Quill. Quill identifies the environment as the source; remove the variable in your shell because the app cannot delete it for you.
export ANTHROPIC_API_KEY=sk-ant-...
# or
export OPENAI_API_KEY=sk-...
Work in Quill
Compose, inspect, send, save, and reuse
The editor, provider session, files, images, layouts, and shortcuts that make up the daily workflow.
Work in Quill
A practical shape for long prompts
Give context, requirements, evidence, and success criteria obvious homes.
There is no required template. Use only the sections the task needs; the point is to make different kinds of information easy to inspect before they guide an agent run.
# Outcome

## Context

## Requirements
- One checkable item per line

## Constraints
- What must not change

## Inputs
```
code, logs, or source text
```

## Done when
- The result you can verify
Structure is most useful once a prompt mixes natural language, code, logs, assumptions, constraints, or several steps. It is not ceremony for a one-line question; it is a way to expose ambiguity while you can still fix it.
Work in Quill
Switching between CLIs and APIs
Change execution targets without losing track of the active terminal session.
Menu → Target picks directly; Ctrl+R cycles. With a live CLI or Shell pane, either route asks before replacing the terminal session so the visible pane and active send target cannot diverge.
- Managed CLI → another target: Quill asks first. The session ends like closing a terminal tab and remains resumable from Provider CLI → Resume session, including after restarting Quill.
- Shell → another target: Quill asks first and then closes the ephemeral Shell tab. Manually launched nested tools are not resumable through Quill.
- API → API: an idle switch needs no confirmation. While an API reply is active, finish it or press Esc to cancel before switching to any target. The transcript adds a provider seam so interleaved comparisons stay readable.
If a CLI or Shell process exits, Quill keeps its final output visible and preserves any unsent Compose draft. Press F4 to restart the selected pane or F5 to stop a live CLI or Shell.
Work in Quill
The Shell target
Run the operating-system shell, scripts, builds, git, or a tool you launch yourself.
Shell runs your configured operating-system shell in PROVIDER and hands it the resolved compose text without model-assisted rewriting—no model is involved in that route. Use it to move around a repository, run builds or git, execute a script you composed, or start any installed tool. If you run claude or codex there, that tool uses its own existing login. Quill recognizes nested Claude/Codex so Compose exposes the matching slash commands and Codex skills, and nested Codex gets the same visible input-row surface as the direct Codex target. When the nested program exits, Quill restores the live shell view. The Shell tab remains ephemeral and is not added to managed resumable sessions.
Work in Quill
Use Quill as Claude Code’s external editor
Open Claude Code’s own prompt composer in Quill, then save it back to the CLI.
Quill already follows the external-editor contract: opening a file keeps the process in the foreground, Ctrl+S writes back to that file, and Ctrl+Q returns control to the caller. Set both standard editor variables so Claude Code and other terminal tools can find it.
macOS or Linux · bash / zsh
export VISUAL=quill
export EDITOR=quill
Windows PowerShell · current session
$env:VISUAL = "quill"
$env:EDITOR = "quill"
Add the Unix exports to your shell profile to keep them. In Windows PowerShell, persist them for future terminals with:
Windows PowerShell · persist for your user
[Environment]::SetEnvironmentVariable("VISUAL", "quill", "User")
[Environment]::SetEnvironmentVariable("EDITOR", "quill", "User")- Open Claude Code normally with claude.
- Press Ctrl+G, or press Ctrl+X then Ctrl+E. Claude opens its draft file in Quill.
- Compose and preview the prompt, save with Ctrl+S, then quit Quill with Ctrl+Q.
- Claude Code restores its prompt input with the saved text. Review it there and send when ready.
Merely opening the external draft does not send it through Quill or add it to Quill's sent-prompt history. The file remains the source of truth for this workflow. See Anthropic's interactive-mode reference for the current Claude Code shortcuts.
Work in Quill
Pipe command output in—or a live pane out
Send a diff, log, test run, or generated brief to a live Compose pane—or start a new draft.
When standard input is redirected, Quill reads the UTF-8 text to completion. If an editor is already running, the text is inserted at its Compose cursor through the normal paste-chip, undo, and autosave path. If no editor is running, Quill reconnects the keyboard to that terminal and opens a local unsaved, crash-recoverable draft. Nothing is sent to a provider automatically. Whether it reaches a live editor or opens that new draft, the complete pipe is one Undo/Redo operation.
macOS or Linux
git diff | quill
npm test 2>&1 | quill
cat app.log | quill --append
Windows PowerShell
git diff | quill
Get-Content .\build.log | quill --append
npm test 2>&1 | quill
Windows Command Prompt
git diff | quill
type build.log | quill --replace
quill --new-instance < build.log
The default inserts at the current Compose cursor. Add --append to move to the true document end and add a newline only when neither side already supplies one. Add --replace to replace the complete active Compose document. Both remain local, enforce the normal document limits, and never submit the result.
With several open instances, Quill prefers the one in the sender's working directory; otherwise the most recently interacted-with live editor receives the text. Use command | quill --new-instance to bypass every running editor and always open a separate draft. An explicit file argument wins over redirected input.
Quill can also expose a read-only pane to another command. Use quill --stdout compose, quill --stdout preview, or quill --stdout provider, then redirect the result or pipe it onward. Compose expands collapsed text while retaining image chips; Preview emits its current rendered plain text, including the complete content of collapsed pastes; Provider emits the full retained native CLI or shell transcript with terminal padding and transient overlay chrome removed. Quill adds no trailing newline. Provider output is rejected when no native CLI or shell is running; API transcripts are not substituted. Read-only snapshots use the same matching-working-directory, then most-recently-used fallback rule as incoming pipes.
A complete collapsed text chip resolves to its full hidden content when copied, when the whole Compose pane is copied, or when Compose is written to stdout. Preview and Preview stdout always render the full pasted text, even while its chip remains collapsed in Compose.
The producing command must finish before delivery; do not use an endless stream such as tail -f. Piped input is local-only and uses the same safety limits as an opened prompt file: UTF-8, at most 16 MiB and 100,000 lines. Endpoint records are private to the operating-system user, each live instance uses a random authenticated secret, and prompt bytes are sent only after the receiver proves it knows that secret.
Delivery to a running editor does not need a TTY. Starting a new interactive Quill does need a controlling terminal so the application can restore keyboard input after consuming the pipe. If a menu, confirmation, or input dialog covers Compose, the live editor rejects the handoff and the sending command reports the reason—nothing is inserted later or routed into that field.
Work in Quill
The launch bar: directory & flags
Start each managed CLI or shell in the right repository with the right arguments.
Starting a CLI or Shell session with F4 opens a two-step launch bar: first the working directory, then extra arguments. ~ expands to your home directory. Press Enter twice to keep the defaults or Esc to cancel. Set per-CLI defaults under Setup → Providers; Shell defaults and the launch-bar toggle live under Setup → User configuration. Press F5 to stop the live pane from any workspace focus.
The arguments belong to the provider CLI itself. Run claude --help or codex --help, or use the Claude Code CLI reference and Codex CLI reference.
Work in Quill
Commands & skill mentions
Discover the active CLI's real commands, prompts, and installed Codex skills.
With a Claude Code or Codex target active—or with either provider launched manually inside Quill's Shell pane—type / at a word boundary to complete that CLI's available commands and prompts. With Codex active, type $ for discovered skills. The popup reads the real built-in, user, and project entries and narrows as you type. Enter or Tab completes; Esc dismisses. Valid mentions highlight in Preview, but Quill keeps the slash command itself intact and lets the CLI decide what the invocation means.
Work in Quill
Templates, files & history
Save ordinary Markdown, preserve image assets, reuse templates, and reload prior prompts.
Ctrl+S saves. Open and first Save always show an editable path bar. When the desktop supports it, Quill also opens the native file picker. On headless Linux, SSH, or systems without zenity or kdialog, type the path and press Enter. Later saves write to the same file. Ctrl+O opens Markdown or text the same way. Unsaved work is guarded, and drafts recover across restarts.
Saved prompts are ordinary files, including agent instructions such as AGENTS.md, CLAUDE.md, and SKILL.md. When a document contains image chips, Quill copies their pixels to a sibling asset folder and writes relative Markdown image links so the document stays portable with its assets.
F2 → Save Preview… exports the readable conversion used by Send Preview without sending anything. It opens the same native save picker as Save where supported. Choose a location, then press Enter in Quill to export; the path stays editable, including when the picker is canceled or unavailable. The editable path defaults to prompt_preview.md in the configured save directory, or a sibling file named after the current source with _preview.md. It includes complete collapsed text regardless of pane width or scroll, with pasted images copied into portable sibling assets. Existing destinations require replacement confirmation in the OS dialog or Quill, without a second prompt for the same native selection. The current source and its symlink or hard-link aliases are rejected. Esc cancels the field or background export. Compose, its current file path, dirty status, Undo, and recovery are preserved. Exporting Preview does not mark the source saved; use ordinary Save for that.
For logos, character art, logs or literal Markdown, use a fenced block labeled text. Three backticks normally suffice; six allow triple-backtick examples inside. Put each fence at the start of its own line:
Literal text or character art
``````text
   ▐▛███▜▌   Claude Code
  ▝▜█████▛▘  text surface
    ▘▘ ▝▝
# stays literal; **so does this**
``````
Preview preserves the block's lines and spaces without syntax highlighting. Save and Send Compose retain the source; Save and Send Preview retain the literal body inside safe fences while converting surrounding Markdown. The outer fence length may change. Collapsed paste chips still contribute their complete content. Widen Preview for wide artwork; exports and sends include the whole block. Prefer spaces for portable alignment because tab stops can differ between apps.
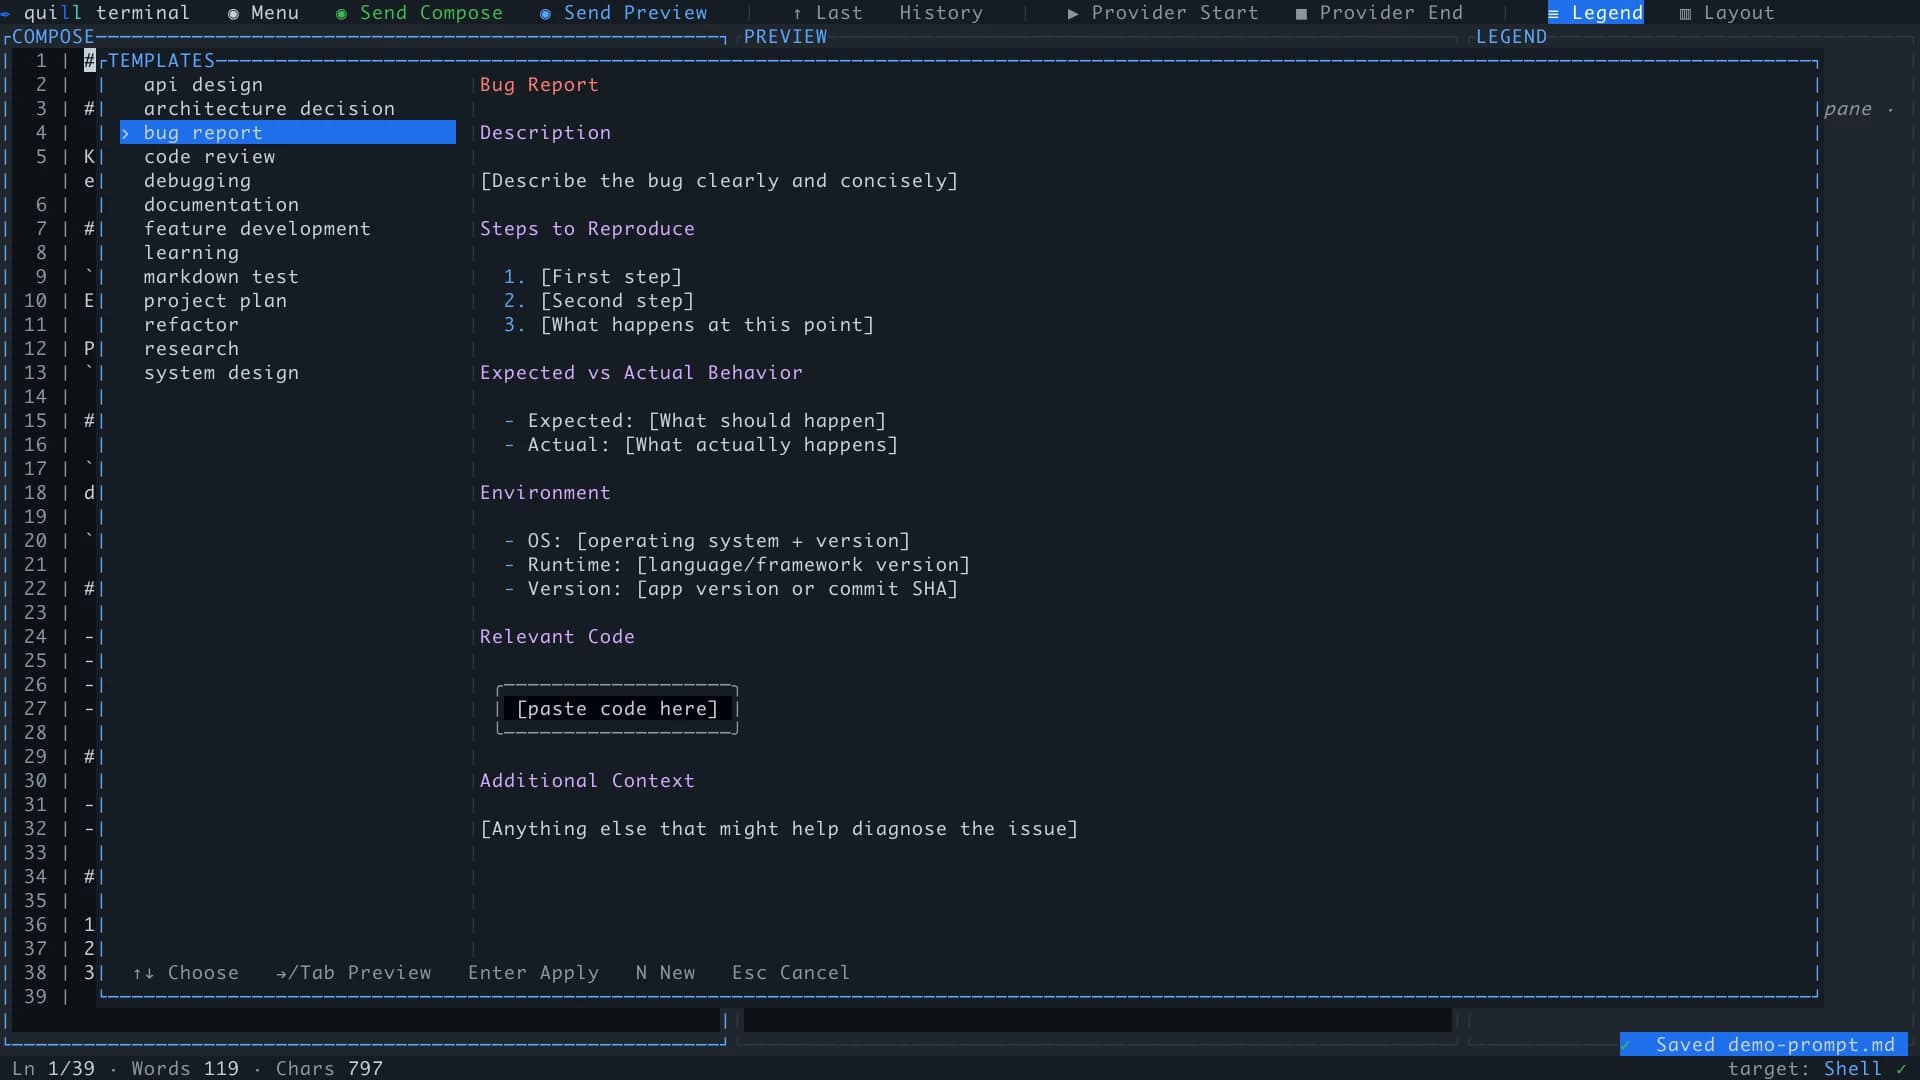
Ctrl+T opens built-in and custom templates. Custom templates are Markdown files under ~/.quill/templates, so they can be inspected, versioned, copied, and shared. Sent prompts are recorded in searchable local History by default. The top-bar History button opens Browse/search, also available in Menu → History. Loading a prompt offers Replace or Keep both when Compose contains text. Menu → History can also export or securely clear entries; recording and retention are configurable locally.
Undo/Redo can restore the previous document after New, Open, a template, Last, history loading, or pipe replacement, including its paste and image mappings. Up to eight document replacements are retained during the session, subject to a 64 MiB budget; the most recent replacement is always kept. Typing and pasted-block Undo share a separate 64 MiB memory target, retaining the current draft and nearest undo step even if those alone exceed it. This undo history ends when Quill closes. The current unsaved draft is autosaved for crash recovery; explicitly choosing Discard when quitting removes that draft. Save or cancel quit to retain your work.
Work in Quill
Recall the last prompt
Bring the most recent local-history prompt back without opening the History browser.
Select ↑ Last in the top bar or press Ctrl+↑. With Compose empty, Quill loads the last sent prompt immediately. With an existing draft, Quill asks whether to Replace draft, Keep both, or cancel. Keep both places the recalled prompt first and preserves the current draft below a blank line.
Recall reads the local prompt history and never contacts a provider. It is unavailable when history recording is disabled or no sent prompt exists; use the History top-bar button for older entries and search, or Menu → History for export and secure clear.
Work in Quill
Editing, copy, paste & selection
Use normal document controls across Compose, Preview, and terminal scrollback.
Compose supports mouse and keyboard selection, select all, cut, copy, paste, undo, redo, find and find-next, indentation, and normal cursor movement. Soft wrapping keeps a word together when it fits on the next displayed row, while an over-wide URL or token still wraps safely at the pane edge. Up and Down move one displayed row, not an entire logical bullet or numbered item. Preview and Provider support selection and copy, including terminal scrollback. A copy bubble appears beside mouse selections. Resizing clears an existing selection; select again afterward. Recognized provider footer notices are excluded from copied text; the same words inside a prompt or response remain intact.
Paste as-is, as plain text to remove formatting and ANSI codes, or as Markdown-smart text to normalize common rendered bullets and checkboxes. Long pastes collapse into an expandable chip so the instructions around them remain easy to read. Each clipboard paste and incoming pipe is one Undo/Redo operation. Copy a complete collapsed chip—or copy the whole Compose pane—and Quill places the chip's full hidden text on the clipboard rather than its label.
Inside Quill panes, use Quill's Ctrl shortcuts (⌃ in the macOS in-app legend) for pane-aware Select All, Copy, Cut, and Paste. Native shortcuts owned by the terminal application—such as ⌘A/⌘C on macOS, Ctrl+Shift+A in Windows Terminal, or Ctrl+Shift+C in common Linux terminals—operate on the terminal viewport, not a logical Quill pane. On macOS, ⌘V is host paste; prefer ⌃A/⌃C/⌃V for Quill's pane-aware actions. Quill leaves those global terminal preferences untouched. If a host such as Windows Terminal reserves Ctrl+C or Ctrl+V, use F2 → Edit for the pane-aware action. If a host-native Paste is forwarded as terminal text, a clipboard-matching long or multiline burst still follows Quill's paste-chip, provider-safety, and single Undo/Redo path.
The status bar keeps the cursor line, total lines, words, characters, selected characters, and a rough token estimate visible. Word, character, and token totals use the resolved prompt, so a collapsed paste is counted at its full size even while Compose shows one chip. Line numbers refer to logical Compose lines. Characters are Unicode scalar values, and words are separated by whitespace. Selecting a complete chip counts the full copied payload. The token figure is resolved Compose characters divided by four, rounded up. It excludes provider conversation history, system prompts, tools, and image tokens; actual API usage and billing are separate. Shell hides this estimate.
Work in Quill
Large pastes & image context
Keep bulky evidence compact without silently losing any of it at handoff.
Paste a long log, stack trace, query, or source file and Quill collapses it into a chip. Click the chip to expand it; once expanded, it becomes ordinary editor text. Extremely large pastes remain collapsed for responsiveness. Their full content is rendered in Preview and included in Save and Send Compose. Send Preview converts the full expanded text, including content hidden inside chips. Expanding a chip is undoable.
Clipboard images and screenshots become recoverable image chips. Anthropic and OpenAI API targets receive structured image bytes: up to 20 PNG attachments, 5 MiB per image, and 20 MiB combined. CLI and Shell targets receive the images' local paths in the handed-off prompt so their own tools can open them. Quill blocks the send when a referenced attachment is missing, invalid, or outside the target's limits instead of silently dropping context.
Work in Quill
Layouts & themes
Arrange Compose, Preview, and Provider around the task and terminal width.
Menu → Layout offers six side-by-side and stacked combinations of Compose, Preview, and Provider. Drag dividers to resize, use the Reset pane balance action to restore layout-specific proportions, and toggle the Markdown legend with Ctrl+L. In layout labels, | means side by side and — means stacked. Dark and light themes use the same palettes as this website. Native CLIs keep their own explicit colors. Quill sends prompt text without background styling; Claude's submitted-message blocks can use a different background. Use /theme inside Claude to choose its palette independently of Quill's theme. Apple Terminal automatically uses compatible display for complex emoji: keycaps show their digit, flags show letters, and joined/modified emoji or private-use glyphs use <> (or ? in one cell). Quill's copy, save and send actions retain the original Unicode. Under [ui] in Quill's config, set glyph_mode to "compatible" to force this on another host, or "native" to keep original glyphs. The default is "auto"; restart after editing. If SSH or tmux hides the host identity, choose compatible explicitly. Provider height changes preserve the live cursor and bounded main-screen scrollback. Width changes do not reflow old terminal output; full-screen CLIs repaint for the new size. Bottom Provider layouts keep at least ten usable Provider rows when the terminal has room for both panes. If the host window is too short for a provider's interface, enlarge it or choose a side-by-side layout. In Legend, Up/Down chooses a section, Left/Right collapses or expands it, Enter or Space toggles it, Page Up/Page Down scrolls, and Esc returns to Compose. Collapse all and Expand all are available by keyboard or mouse.
Work in Quill
Keyboard shortcuts
The portable controls used most often in the editor and terminal panes.
| Ctrl+Enter | Send using the saved default (Compose initially) |
| Ctrl+Shift+Enter | Send Preview explicitly, where supported |
| Alt+Enter / Alt+Shift+Enter | Default / Preview send where the terminal reports these chords |
| Ctrl+N / Ctrl+O / Ctrl+S | New / Open / Save |
| Ctrl+T / Ctrl+H | Templates / History |
| Ctrl+↑ | Recall the last sent prompt |
| Ctrl+R | Cycle send target |
| Ctrl+F / F3 / Shift+F3 | Find / next / previous |
| Ctrl+C / X / V / A | Copy / cut / paste / select all |
| Ctrl+Z / Ctrl+Y | Undo / redo |
| Ctrl+L | Toggle Markdown legend |
| Tab / Shift+Tab | Nest or outdent lists, or indent text; cycle from read-only panes |
| Ctrl+Tab / Ctrl+Shift+Tab | Next / previous pane in enhanced terminals, including a live CLI |
| F1 | Quill info / help menu |
| F2 | App menu |
| F4 | Launch the selected CLI or Shell |
| F5 | Stop the active CLI or Shell |
| F6 / Shift+F6 | Portable next / previous pane fallback |
| F7 | Focus top actions; arrows or Tab move, Enter activates, Esc returns |
| F10 | System prompt bar |
| Ctrl+Q | Quit, guarded when work is unsaved |
Quill displays native control-key glyphs on macOS. If a POSIX terminal reports Ctrl+Enter as plain Enter, use Alt+Enter or the Send button. On Windows, avoid Alt+Enter and use Ctrl+Enter or the button. When a live provider CLI has focus, use Ctrl+Tab or the portable F6 fallback to return to Compose. Ctrl+C without a provider selection remains the CLI interrupt, and Ctrl+A stays with the CLI input. F2 → Edit → Copy without a selection copies all retained pane text, including terminal scrollback or previous API exchanges. If a CLI keeps additional history privately, scroll through it while selecting to capture those rows before copying.
The Ctrl rows above are Quill's pane-aware controls. A terminal emulator can reserve its own native selection/copy shortcuts before a TUI receives input; those remain viewport operations. Terminal- native paste content is normalized into Quill's paste flow when the host forwards it.
Stay in control
Access, updates, local data, and support
Keep the application current, understand what stays local, and recover cleanly when something goes wrong.
Stay in control
Access, billing & devices
Manage plans, receipts, license seats, renewals, and device replacement.
Public access is purchase-only, with monthly and yearly subscriptions through Paddle. The developer may send selected reviewers, testers, friends, or partners a secure one-time private evaluation link. It can be locked to a specific email; if no email is specified, it binds to the first verified SSO account that accepts it. The invitation shows exactly how long remains to claim it, and the 14-day evaluation clock starts only on acceptance.
Moving between pages, refreshing, or completing email-link/OAuth sign-in does not lose a valid invitation. Once accepted, the entitlement, license, devices, and evaluation end stay attached to the verified account. The original link is no longer needed, and its later expiry does not shorten the evaluation. If the link expires before acceptance, it creates no access; request a replacement or purchase normally.
One active license covers up to 3 of your own computers across the supported operating systems. The account page lists activated devices and lets you revoke an old computer before activating its replacement. Quill reports the OS, architecture, and installed app version for licensing and update visibility; prompt content is never included.
Inside the app, open the menu and choose Account to see the verified email, access type, subscription cycle, start/end dates, and renewal state returned by the license service. Every interactive startup requests fresh details; a current cached lease and clock checkpoint let the editor open while the check runs in the background. Other starts retain the guarded license check. Choose Refresh account for an immediate request. Tab/Shift+Tab or arrows select Refresh, Open account page, or Sign out; Enter activates. The last-checked time records a successful service response, so offline details remain visibly cached. Periodic lease refresh continues while Quill remains open. Access is checked independently against the signed lease and its exact deadline.
The Account panel also provides a guarded local sign-out. Quill asks you to save or retain dirty work and requires an active API reply to finish or be cancelled. After sign-out, every launch form—including a file, target, file-plus-target, or pipe—returns to browser/key activation and resumes only after valid access is restored. Local sign-out does not cancel Paddle billing, revoke the registered device, or free its seat; use this website's Account page for those actions. Revoke a lost or compromised computer remotely rather than relying on local sign-out.
The signed lease, anonymous device ID, clock-rollback checkpoint, and last reported app version, signed-out marker, and verified account summary are kept together in one OS credential-vault record. On macOS, the first licensed launch may ask whether quill can use that confidential Keychain item. Enter the Mac login-keychain password and choose Always Allow for a known Quill binary. Normal startup reads one bundled license record; a successful online heartbeat writes one consolidated update. An hourly checkpoint or later refresh can write again, and provider keys are separate items. Choosing Allow approves one operation. A changed unsigned or ad-hoc executable can need trust again; stable release signing helps preserve application identity. A fixed number of dialogs cannot be guaranteed. Several rows labeled quill can be different accounts, including retained legacy license records, so deleting same-label rows is not a remedy for repeated prompts. The local keychain.log records attempted operations and public credential references for support; it never records a license key or signed token and does not prove that the attempted operation succeeded.
Revoking a device frees its seat but permanently blocks that device ID from using the same license key again. Contact support if a device is removed by mistake.
Treat the license key like a password: it is the credential the app presents during activation, and anyone who has it can occupy an available device seat. A private evaluation is limited to one device; paid and complimentary access covers up to 3. Sharing an installer does not share access. If a device is unfamiliar, revoke it from the account page and contact support to rotate the key. Rotation prevents the old key from activating or refreshing; a previously issued signed lease can remain valid only until its existing deadline—at most 24 hours for an evaluation or 3 days for paid and complimentary access, and never beyond the entitlement end.
Plan changes show Paddle's prorated amount and next recurring charge before confirmation. The hosted billing portal manages invoices, payment methods, and cancellation. A scheduled period-end cancellation keeps access while the subscription remains active, through its paid-through boundary. Immediate or completed cancellation stops new leases; an existing offline lease keeps only its remaining time.
Paid and complimentary access receives a signed offline lease for no more than 3 days; evaluation leases last at most 24 hours. A failed heartbeat or lost connection retains only the current lease's remaining time. A token never runs past its paid-through, grant, or evaluation end. A missing or due clock checkpoint must be saved before guarded offline startup can open the editor. A required secure-storage write failure is reported separately from a network failure. The app also monitors the signed deadline while it is open: at expiry the editor closes into the activation screen. The user does not need to uninstall it; local data remains in place, and purchasing or receiving new access unlocks the same installation. Refunds, chargebacks, access revocations, and device revocations are enforced no later than the end of the current verified lease.
When the activation screen appears
- On first launch, after an explicit local sign-out, or after full credential cleanup.
- When an evaluation ends or paid/complimentary access is no longer active and an online refresh cannot restore it.
- When the current signed offline lease reaches its deadline while Quill is open or starts already expired.
- After an authoritative refund, chargeback, license/device revocation, completed cancellation, or failed-payment state is received.
- When stored license state is invalid, belongs to another installation, the system clock moves behind its protected checkpoint, or required secure storage is unavailable.
Installing a newer Quill version, changing between monthly and yearly billing while access remains active, or temporarily losing the network does not by itself require activation. Normal updates retain the same installation ID and device seat. A scheduled cancellation continues through its paid-through date; an unexpired signed lease keeps only its existing offline time.
During an open session, Quill checks refresh eligibility every 15 minutes and contacts the service when the lease has passed half its lifetime, account details are a day old, or this version is unreported. Startup and Refresh account request an online check directly. Local access is checked at least once a minute and at expiry, with a separate deadline that remains effective while network or storage work is blocked. An explicit service denial stops access; an unavailable service cannot extend the signed lease.
Stay in control
Update Quill Terminal
Check in the background or on demand, then replace only the installed binary.
Quill checks for releases in the background at startup when update checks are enabled. Open the menu and choose Check for updates for an immediate result. A manual check opens one update panel showing the installed version, latest release, and check status. When a newer release is available, the same panel offers Ignore and Download now. Update actions appear only when an update is available; Website and Downloads remain accessible. Tab/Shift+Tab or arrows select actions and the Website/Downloads links; Enter activates. Page Up/Page Down, Home/End, and the mouse wheel scroll longer content. Ignore closes the panel; a later launch can notify you again. It does not schedule an installation.
- Choose Download now. If Compose has unsaved work, choose Save, Keep recovery, or Cancel. Quill completes safe shutdown before opening the authenticated download page. Browser sign-in may be required even when the app is already licensed.
- Install after Quill closes. If you choose Ignore instead, keep working and return when ready; the current process remains on its current version.
- Use the same installation method as before. Rerun the matching native installer or command-line script, update the same .deb/.rpm package through its package manager, or run brew upgrade arafayrs95/tap/quill for Homebrew. Mixing Windows Setup and the PowerShell installer can leave two binaries in different locations.
- Reopen Quill after installation. If macOS/Linux replaced the binary while Quill stayed open, return to the update panel and choose Restart installed update. Save an unsaved draft or keep it in durable recovery.
Activation, settings, drafts, templates, saved files, session records, and history stay in place during a normal update. Download now and Restart installed update guard the current instance only. Save or keep recovery in every other window separately, and reopen each window to use the installed version.
Quill does not mutate its already-running process. macOS/Linux can install the replacement while Quill stays open; Windows Setup may require closing Quill because its executable is in use. The account and Admin version views update after the installed app next completes a licensed online activation or refresh, rather than at download time.
Stay in control
Uninstall Quill Terminal
Remove the executable safely, with an explicit option for permanent local cleanup.
Windows Setup adds an uninstaller to the Start Menu and Windows Settings → Apps. Linux package installs can be removed with the package manager. These verified uninstallers cover native packages, Homebrew, and command-line installations:
macOS or Linux
curl -fsSL https://quillterminal.app/uninstall.sh | sh
Windows PowerShell
irm https://quillterminal.app/uninstall.ps1 | iex
Windows Command Prompt
powershell -NoProfile -ExecutionPolicy Bypass -Command "irm https://quillterminal.app/uninstall.ps1 | iex"
A normal uninstall preserves activation, settings, drafts, templates, and history for an easy reinstall. Before permanent cleanup, remove this computer under Account → Activated devices to revoke it and free the license seat. The following commands then delete Quill's local data and attempt to remove its credential-vault entries where operating-system tools are available. That cleanup cannot be undone. On Linux without secret-tool, remove Quill entries manually through the Secret Service or keyring UI.
Explicit credential cleanup reports failures or uncertain results and exits nonzero when removal cannot be confirmed. The binary or local data may already have been removed before that error. On Linux, secret-tool clears only unlocked matches; a no-match result can mean the entry is absent or locked. Review the reported accounts in your credential manager before retrying.
macOS or Linux · permanent cleanup
curl -fsSL https://quillterminal.app/uninstall.sh | QUILL_REMOVE_DATA=1 QUILL_REMOVE_CREDENTIALS=1 sh
Windows PowerShell · permanent cleanup
$env:QUILL_REMOVE_DATA="1"; $env:QUILL_REMOVE_CREDENTIALS="1"; irm https://quillterminal.app/uninstall.ps1 | iex
Stay in control
Local data, privacy & network boundaries
Know exactly what is stored on the computer and which actions use the network.
The default data root is ~/.quill on macOS and Linux, and %USERPROFILE%\.quill on Windows, with %APPDATA%\quill as its fallback. QUILL_HOME overrides this data root on every platform, which is useful for a separate development workspace. It does not isolate the production credential namespace or shared license coordination. The paths below are relative to the selected data root.
| config.toml | Theme, layout, targets, and non-secret settings |
| history.db | Local plaintext prompt and API-reply history |
| sessions.db | Managed CLI resume registry |
| drafts/ | Per-workspace recovery drafts and image sidecars |
| images/ | Clipboard images referenced by compose chips |
| templates/ | Custom Markdown templates |
| models.json | Cached provider model capabilities |
| keychain.log | Best-effort secret-free secure-store access audit |
History is enabled by default, retained locally in plaintext, and capped at 1,000 entries unless you change the retention limit. Menu → History can export it to Markdown or clear it using SQLite secure deletion and database compaction. Set enabled = false under [history] to stop recording.
Provider API keys saved through Setup stay in the OS credential vault; direct API sends also support the environment fallback described above. Prompt files, drafts, templates, history, and session records remain local. Network access is used for licensing; enabled release and model-metadata checks; key verification; and the provider API or CLI actions you initiate. Quill does not upload local prompt history as product analytics.
Stay in control
Troubleshooting
Resolve the installation, terminal, credential, and activation failures most users meet.
- Command not found: open a new terminal after installation. If you used a portable archive, place its directory on your user PATH, then run quill --version.
- Wrong processor build: run uname -m on macOS/Linux or open Windows Settings → System → About. Use arm64 for Apple Silicon, Linux arm64, or Windows 11 ARM; use x86_64/x64 for Intel or AMD.
- Linux will not start: the current Linux builds require glibc 2.34 or newer. The .deb and .rpm packages declare that minimum; the shell installer checks it before downloading.
- Ctrl+Enter inserts a newline: the terminal cannot distinguish that chord. On macOS/Linux use Alt+Enter; on Windows use Ctrl+Enter in Windows Terminal or select the Send button.
- A key or license cannot be stored on Linux: unlock or install a Secret Service provider such as GNOME Keyring or KWallet. For provider API keys in a headless environment, use the documented environment fallback.
- Activation is rejected: confirm access is active, copy the complete key, check the internet connection and system clock, and retry. Never send a license or API key in a public issue.
- Windows says Activation storage needed: confirm quill --version reports v0.12.11 or newer, close every Quill window, and install the current Setup over the existing copy. Open the Start Menu shortcut, approve once, and leave Quill open; the editor should appear automatically. If it still fails, include the complete red error line and support IDs when contacting support. Do not keep approving requests or revoke rows by hostname alone; first identify the support ID of an installation that reaches the editor and survives a restart.
- Device limit reached: revoke a computer you no longer use under Account → Activated devices, then retry.
- Update says Quill is running: Windows may lock the executable; save or keep recovery, close every Quill Terminal window, and rerun Setup. macOS/Linux users can normally install first and use the update panel's safe Restart action.
- Checksum mismatch: delete the download and fetch it again. Do not install a file whose SHA-256 differs from the account download page.
Still stuck? Use the feedback page or email support@quillterminal.app. Include the operating system, processor, Quill version, terminal, and exact error text—but never a secret.